Challenging users
Challenging users based on actions
An action is an event that a user performs in your application. For example, this could be a user signing in or updating their password.
Authsignal allows you to record these actions through our track API. For each action, you can then define a set of rules that will determine whether the user should be required to complete a reauthentication challenge before proceeding.
How to track an action
To track an action, we recommend using one of our server-side SDKs. You can also use our Server API directly.
A common use case is tracking an action when a user signs in. In code, this would look like:
- Node.js
- C#
- Java
- Go
- Ruby
- PHP
- Python
const result = await authsignal.track({
  userId: user.id,
  action: "signIn",
  redirectUrl: "https://yourapp.com/callback", // Only required when using Authsignal's pre-built UI
});

const url = result.url;
var request = new TrackRequest(
  UserId: user.Id,
  Action: "signIn",
  RedirectUrl: "https://yourapp.com/callback");

var response = await authsignal.Track(request);

var url = response.Url;
TrackRequest request = new TrackRequest();
request.userId = user.id;
request.action = "signIn";
request.redirectUrl = https://yourapp.com/callback";

CompletableFuture<String> url = authsignal.track(request).thenApply(response -> response.url);
response, err := authsignal.TrackAction(
  client.TrackRequest{
    UserId: user.Id,
    Action: "signIn",
    RedirectUrl: "https://yourapp.com/callback",
  },
)

url := response.Url;
result = Authsignal.track({
  user_id: user_id,
  action: "signIn",
  redirect_url: "https://yourapp.com/callback",
})

url = result[:url]
$result = Authsignal::track(
  userId: $userId,
  action: "signIn",
  payload: array("redirectUrl" => "https://yourapp.com/callback"));

$url = $result["url"]
result = authsignal_client.track(
  user_id=user_id,
  action="signIn",
  payload={"redirectUrl": "https://yourapp.com/callback"}
)

url = result["url"]
The action response
When you track an action, Authsignal will return an action response. Some of the key fields are highlighted below:
state
The state field indicates the status of the action. It can be one of the following values:
CHALLENGE_REQUIRED: The action is pending. This means that applied rules have determined the user must complete a challenge before proceeding.ALLOW: The rules have determined the user can proceed without a challenge.BLOCK: The rules have determined the user cannot proceed with the action. This is a terminal state.
If we take the earlier code snippet as a starting point we can extend it to see how we could use the state field to perform our business logic:
- Node.js
- C#
- Java
- Go
- Ruby
- PHP
- Python
const result = await authsignal.track({
  userId: user.id,
  action: "signIn",
  redirectUrl: "https://yourapp.com/callback",
});

if (result.state === "CHALLENGE_REQUIRED") {
  // Take the user to Authsignal pre-built challenge UI
  res.redirect(result.url);
} else if (result.state === "ALLOW") {
  // Allow the user to sign in
} else if (result.state === "BLOCK") {
  // Block the user from signing in
}
var request = new TrackRequest(
  UserId: user.Id,
  Action: "signIn",
  RedirectUrl: "https://yourapp.com/callback");

var response = await authsignal.Track(request);

if (response.State == UserActionState.CHALLENGE_REQUIRED) {
  // Take the user to Authsignal pre-built UI
  var url = response.Url;
} else if (response.State == UserActionState.ALLOW) {
  // Allow the user to sign in
} else if (response.State == UserActionState.BLOCK) {
  // Block the user from signing in
}
TrackRequest request = new TrackRequest();
request.userId = user.id;
request.action = "signIn";
request.redirectUrl = "https://yourapp.com/callback";

authsignal.track(request).thenAccept(response -> {
  if (response.state == UserActionState.CHALLENGE_REQUIRED) {
    // Take the user to Authsignal pre-built UI
    String url = response.url;
  } else if (response.state == UserActionState.ALLOW) {
    // Allow the user to sign in
  } else if (response.state == UserActionState.BLOCK) {
    // Block the user from signing in
  }
});
response, err := authsignal.TrackAction(
  client.TrackRequest{
    UserId: user.Id,
    Action: "signIn",
    RedirectUrl: "https://yourapp.com/callback",
  },
)

if response.State == "CHALLENGE_REQUIRED" {
  // Take the user to Authsignal pre-built UI
  url := response.Url;
} else if response.State == "ALLOW" {
  // Allow the user to sign in
} else if response.State == "BLOCK" {
  // Block the user from signing in
}
result = Authsignal.track({
  user_id: user_id,
  action: "signIn",
  redirect_url: "https://yourapp.com/callback",
})

case result[:state]
when "CHALLENGE_REQUIRED"
    # Take the user to Authsignal pre-built UI
    url = result[:url]
when "ALLOW"
    # Allow the user to sign in
when "BLOCK"
    # Block the user from signing in
end
$result = Authsignal::track(
  userId: $userId,
  action: "signIn",
  payload: array("redirectUrl" => "https://yourapp.com/callback"));


switch ($result["state"]) {
    case "CHALLENGE_REQUIRED":
        // Take the user to Authsignal pre-built UI
        $url = $result["url"]
        break;
    case "ALLOW":
        // Allow the user to sign in
        break;
    case "BLOCK":
        // Block the user from signing in
        break;
}
result = authsignal_client.track(
  user_id=user_id,
  action="signIn",
  payload={"redirectUrl": "https://yourapp.com/callback"}
)

match result["state"]
case authsignal_client.CHALLENGE_REQUIRED:
    # Take the user to Authsignal pre-built UI
    result["url"]
case authsignal_client.ALLOW:
    # Allow the user to sign in
case authsignal_client.BLOCK:
    # Block the user from signing in
url
The url field contains the URL of the Authsignal pre-built UI. In the above example, we redirect the user to this URL when the state is CHALLENGE_REQUIRED.
Once the user has been taken to the pre-built UI they will be required to complete a challenge before they can proceed with the action.
If the user completes the challenge successfully (or exits the challenge UI), they will be redirected to the redirectUrl that was provided when the action was tracked.
token
If you're not using Authsignal's pre-built UI and are building your own UI, you can pass this token to a Client SDK or use it to authenticate to the Client API.
Configuring your action
By default, all actions will be in an ALLOW state. This means that no challenges will be required for the action to proceed. In our sign in example, we
want our users to always complete a challenge before proceeding. To do this, we need to configure our signIn action in the Authsignal Portal.
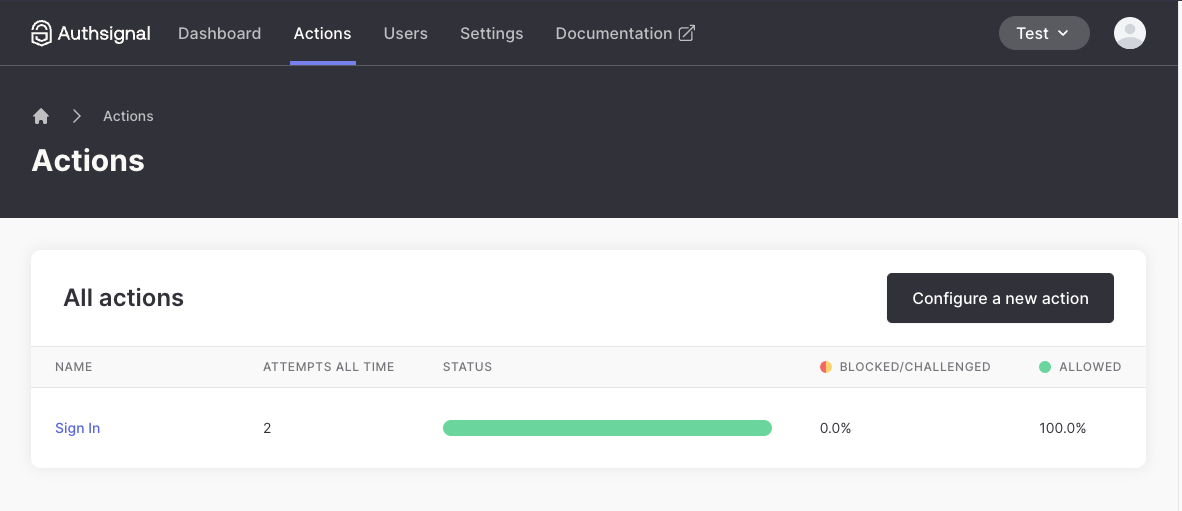
If you have already started tracking your signIn action you should see it listed in the Actions section of the portal like the following:
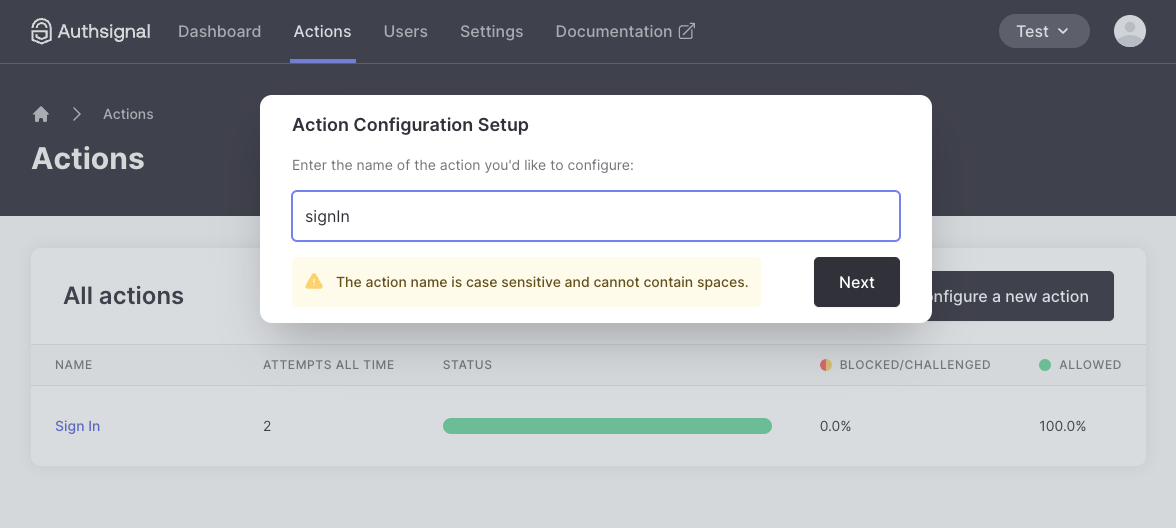
Otherwise, you can configure a new action by clicking the Configure a new action button and naming it signIn.
Once you are viewing your signIn action configuration, go to the Rules tab. Here you can change the default action outcome from ALLOW to CHALLENGE using the dropdown.
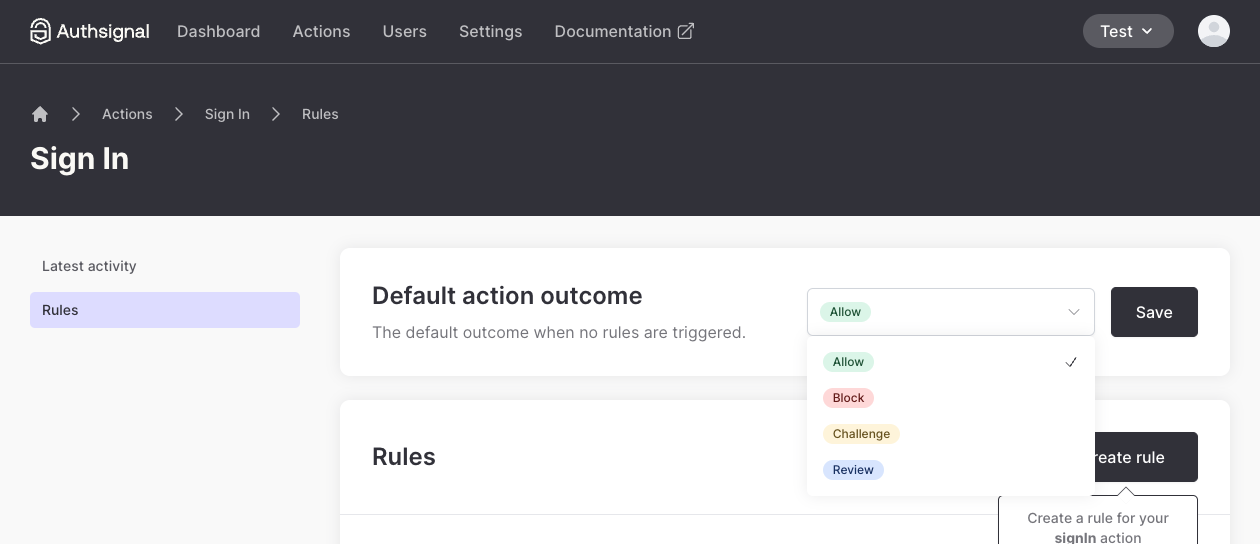
Make sure you click the Save button to save your changes.
Validating an action challenge
It is important that you validate the result of a challenge on your server.
If using Authsignal's pre-built UI, a token search parameter will be appended to your redirectUrl when redirecting back to your application.
Or if you're building your own UI and using one of our Client SDKs, you should send the result token returned by the client SDK to your server.
For example:
- Node.js
- C#
- Java
- Go
- Ruby
- PHP
- Python
const { state } = await authsignal.validateChallenge({ token });

if (state === "CHALLENGE_SUCCEEDED") {
  // The user completed the challenge successfully
  // Proceed with authenticated action or integrate with IdP to create authenticated session
} else {
  // The user did not complete the challenge successfully
}
var request = new ValidateChallengeRequest(Token: token);

var response = await authsignal.ValidateChallenge(request);

if (response.State == UserActionState.CHALLENGE_SUCCEEDED) {
  // The user completed the challenge successfully
  // Proceed with authenticated action or integrate with IdP to create authenticated session
} else {
  // The user did not complete the challenge successfully
}
ValidateChallengeRequest request = new ValidateChallengeRequest();
request.token = token;

authsignal.validateChallenge(request).thenAccept(response -> {
  if (response.state == UserActionState.CHALLENGE_SUCCEEDED) {
    // The user completed the challenge successfully
    // Proceed with authenticated action or integrate with IdP to create authenticated session
  } else {
    // The user did not complete the challenge successfully
  }
});
response, err := authsignal.ValidateChallenge(
  client.ValidateChallengeRequest{
    Token: token,
  },
)

if err == nil && response.State == "CHALLENGE_SUCCEEDED" {
  // The user completed the challenge successfully
  // Proceed with authenticated action or integrate with IdP to create authenticated session
} else {
  // The user did not complete the challenge successfully
}
response = Authsignal.validate_challenge(token: token)

if response[:state] == "CHALLENGE_SUCCEEDED"
  # The user completed the challenge successfully
  # Proceed with authenticated action or integrate with IdP to create authenticated session
else
  # The user did not complete the challenge successfully
end
$result = Authsignal::validateChallenge(token: $token);

if ($result["success"]) {
  # The user completed the challenge successfully
  # Proceed with authenticated action or integrate with IdP to create authenticated session
}
result = client.validate_challenge(token=token)

if result["state"] == "CHALLENGE_SUCCEEDED":
  # The user completed the challenge successfully
  # Proceed with authenticated action or integrate with IdP to create authenticated session
Next steps
In this example, we have configured our signIn action to always require a challenge. However, we may find that our users
are being challenged too frequently. In the next section, we will learn how to configure our action with a rule so that our users only get challenged in high-risk scenarios.